Server Management
This guide describes how to securily configure and manage a Row64 Server.
Row64 Server Directories
Directories used by Row64 Server:
| Directory | Description |
|---|---|
| /opt/row64server | Install location for Row64 Server and UserTools |
| /opt/row64server/conf | Location of the configuration file (config.json) |
| /var/www/dashboards | Where dashboard files are stored |
| /var/www/ramdb | Where dataframe files are stored |
| /var/www/html | Web files |
| /var/log/row64server | Log files |
Dataframe Management
A dataframe is a RamDB table. Dataframes are stored on the server as .ramdb files.
All dataframes are stored under: /var/www/ramdb
Ramdb Sub-Folders
In the /var/www/ramdb directory, there are three sub-folders:
- Live - All deployed dataframes are located in the Live sub-folder. This folder is maintained and updated by the Row64 Server service.
- Loading - Dataframes that are pending deployment should be placed in the Loading sub-folder. This loading mechanism allows you to update and upload data without restarting the Row64 Server service.
- Locked - The Locked sub-folder contains user data. If you want to back up or automate your user list, the
users.ramdbfile contains the list of registered users.
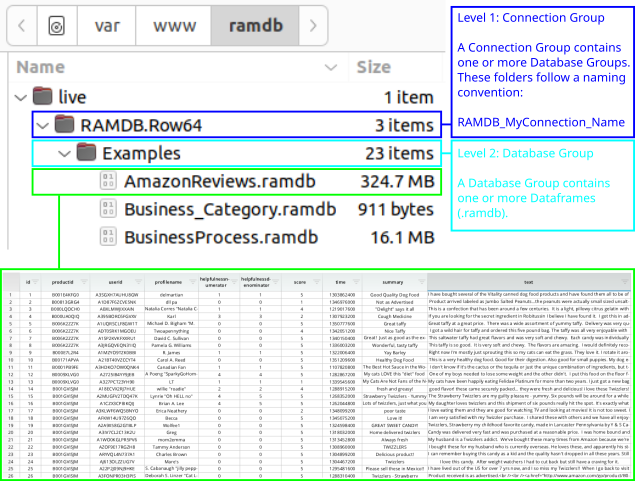
Dataframes Hierarchy
Dataframes have two levels of organization. These are reflected in the folder hierarchy. This allows for flexibility when designing user roles and access.
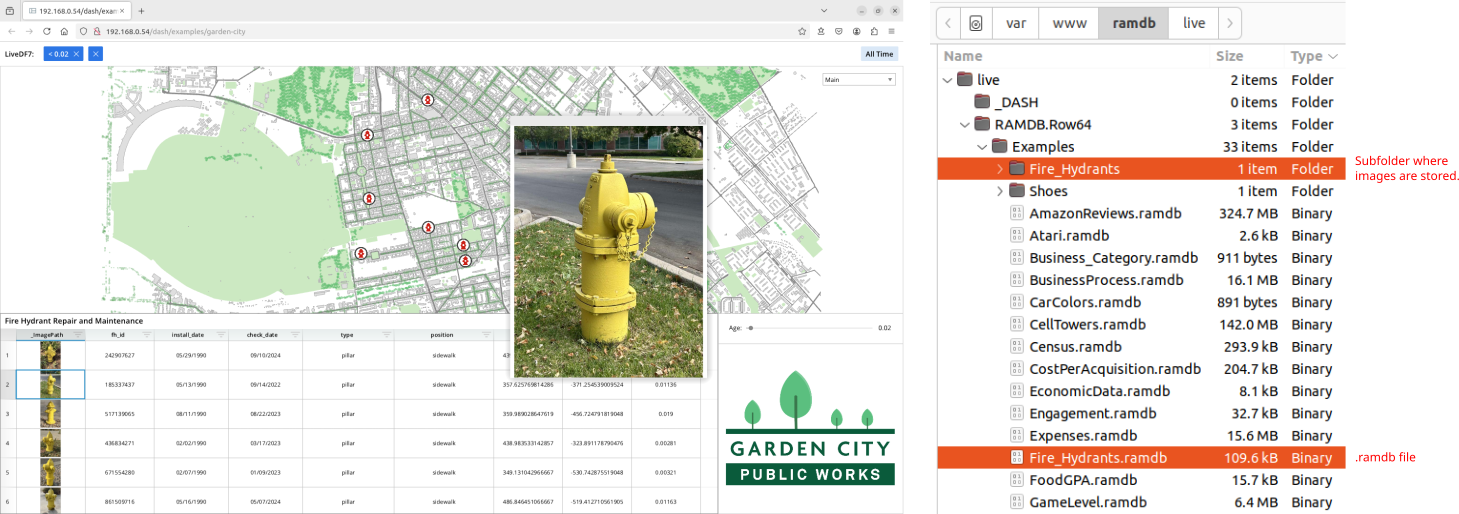
Dataframes Metadata
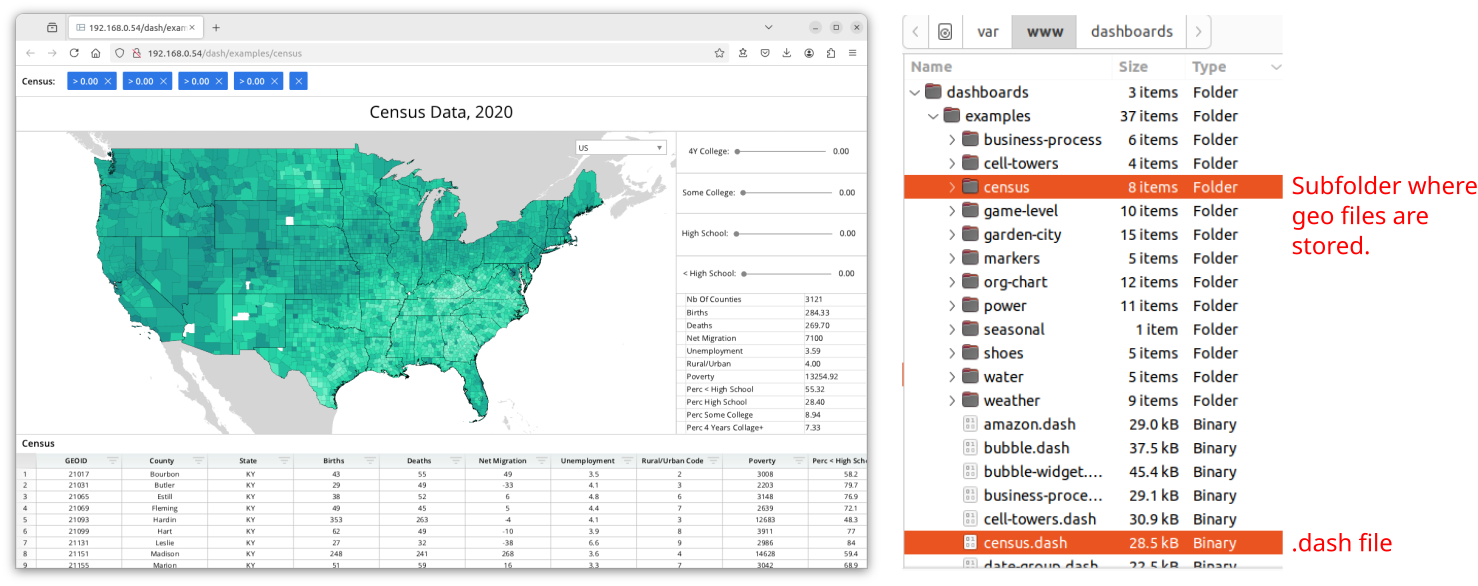
Dataframes sometimes require additional metadata, such as images, that are stored outside of the .ramdb file. In this case, you will see a sub-folder with a matching name of the .ramdb file.
For example, the Garden City dashboard loads a dataframe called Fire_Hydrants that contains many images. As you can see, the Fire_Hydrants RamDb file is paired with a sub-folder where the raw images are stored.
Create Groups
Connection Group
To add a new connection group, you will need to create a new folder in the /var/www/ramdb/live directory and update the config file.
First, create a new directory following the naming convention: RAMDB.MyConnectionName
Set MyConnectionName to the name of your new connection group. For example, if your connection name is "Conn01," the directory name should be: RAMDB.Conn01.
Next, add the new connection group to the config file. Run the following command to open the config file in a text editor:
subl /opt/row64server/conf/config.json
In the "Connection" section, add a new entry, setting "ALIAS" to your new connection group name. Leave the "CONNECTION_TYPE" as "RAMDB".
"Connections":[
    {
        "ALIAS":"Conn01",
        "CONNECTION_TYPE":"RAMDB",
        "DATABASES":[]
    },
    ...
Once you have created your new connection group, you will need to create a database group within it.
Database Group
To add a new database group, you will need to create a new folder in your connection group sub-directory.
First, create a new directory in your connection group directory with the name of your new database group. Run the following commands to first navigate to the connection group directory, and then make the database directory:
cd /var/www/ramdb/live/RAMDB.Conn01
mkdir DatabaseA
(Replace "Conn01" in the top command if you're using a different connection group name).
Second, add the new database group to the config file:
subl /opt/row64server/conf/config.json
In the "Connections" section, find the entry for your connection group, and add an entry to the "DATABASES" section for your new database group.
Set the "DATABASE_NAME" to your new name. Set "ALL_TABLES" to "TRUE" if you want the default access to include all tables. Otherwise, manually list each table in the "TABLES" field.
See the following example:
"Connections":[
    {
        "ALIAS":"Conn01",
        "CONNECTION_TYPE":"RAMDB",
        "DATABASES":[
            {
                "DATABASE_NAME":"DatabaseA",
                "ALL_TABLES":"TRUE",
                "TABLES":[]
            },
        ]
},
    ...
Restart the Server
Once you have modified the folders and the config file, restart the Row64 Server:
sudo systemctl restart row64server
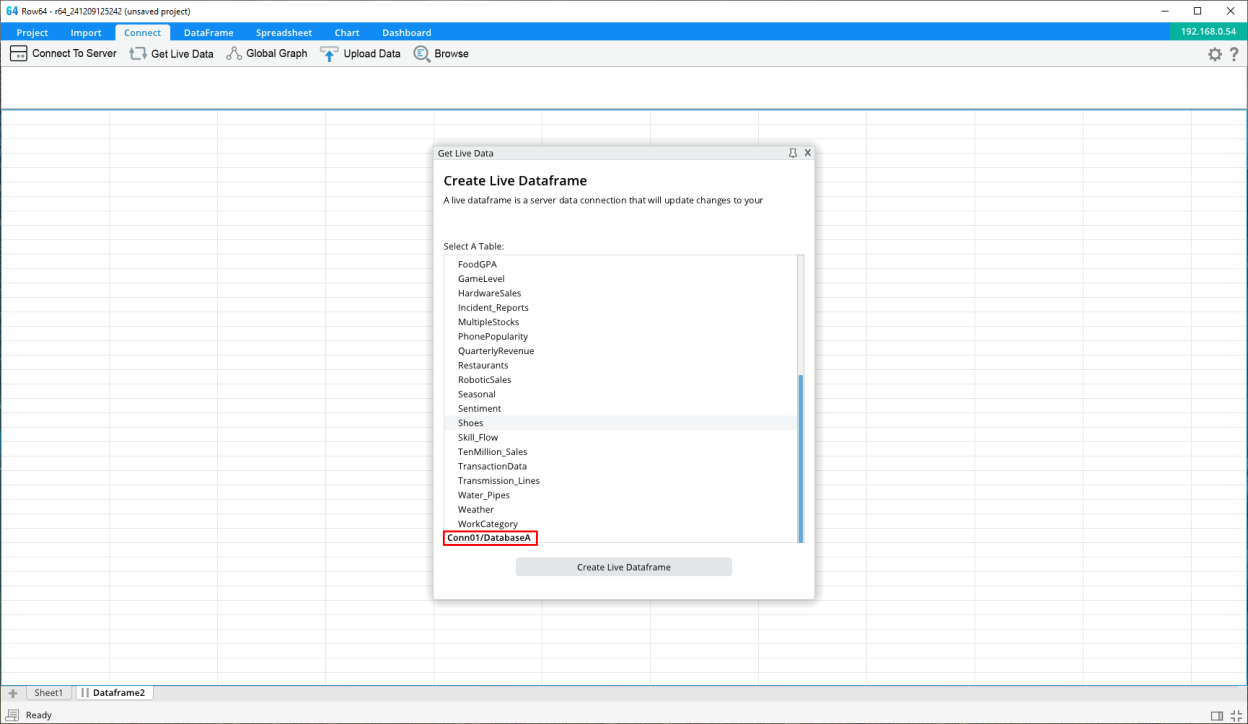
Verify New Connection and Database Groups
In the Studio app, connect to the server and select the Get Live Dataframe option. In the list of tables, you should see a section for the new connection and database groups in the list.
Notes
All folders and files in the /var/www/ramdb directory should have the row64 user as the owner. If the row64 user is not the owner of the directory and file, you can execute the chown command.
Check the owner:
cd /var/www/ramdb/live/RAMDB.Conn01
ls -al
(Change "Conn01" to your connection group name).
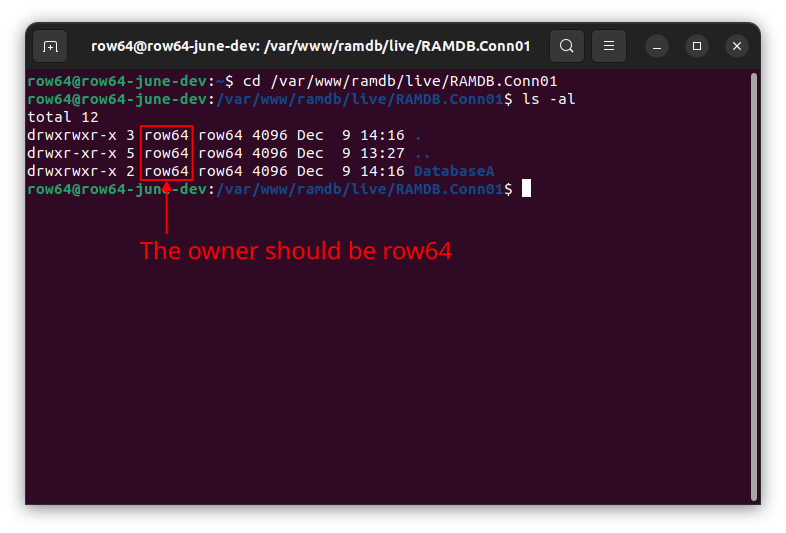
If needed, change the owner:
sudo chown -R row64 DatabaseA
(Change "DatabaseA" with your database group name).
(Optional) Manually Listing Tables
If you want to restrict access to the dataframe tables within a database group, you can set the "ALL_TABLES" fields to "FALSE". In this case, only tables listed in the "TABLES" field can be accessed.
"Connections":[
    {
        "ALIAS":"Conn01",
        "CONNECTION_TYPE":"RAMDB",
        "DATABASES":[
            {
                "DATABASE_NAME":"DatabaseA",
                "ALL_TABLES":"FALSE",
                "TABLES":[ "MyTable01", "MyTable02" ]
            },
        ]
    },
    ...
Dashboard Management
Dashboards are stored on the server as .dash files. All dashboards are stored at the following location: /var/www/dashboards
Dashboard File Hierarchy
Dashboards are organized by dashboard groups. Each dashboard group has its own directory.
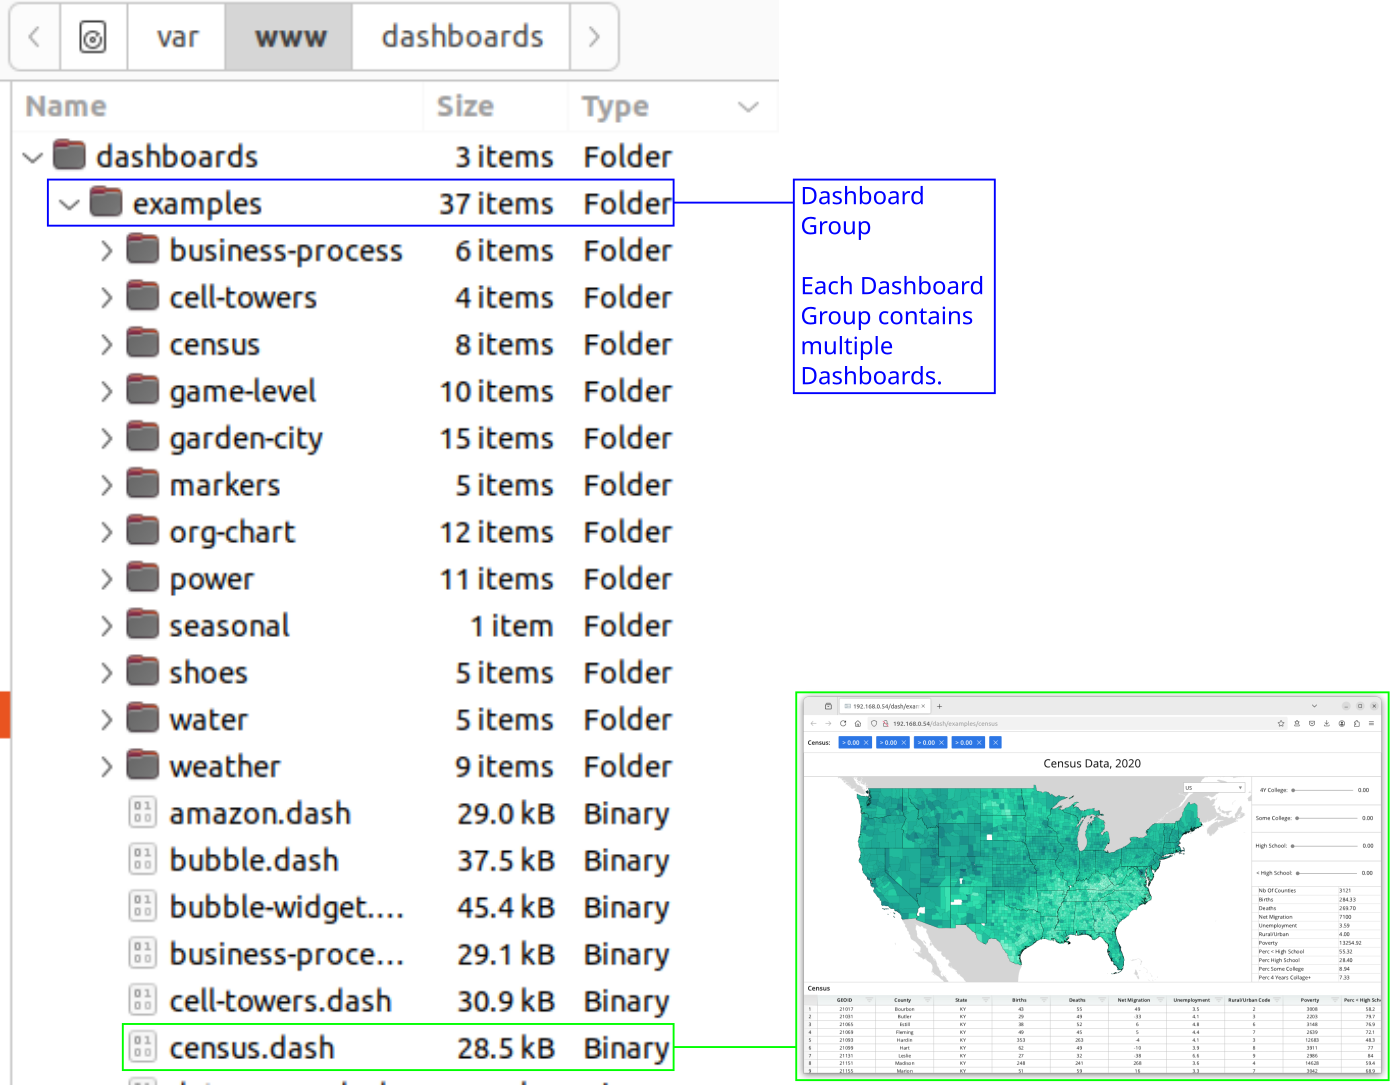
Dashboard Metadata
Dashboards sometime require additional metadata (such as for geo files) that are stored outside of the .dash file. In this case, you will see a sub-folder that matches the name of the .dash file.
For example, the Census dashboard contains layers of shape geometry. These are stored in .geo and .geoz files.
Create a Dashboard Group
To add a new connection group, you need to create a new folder in the /var/www/dashboards directory and update the config file.
Create a new directory with the name of your new dashboard group. In the following example, set "TestGroupA" to the name of your new dashboard group:
cd /var/www/dashboards/
mkdir TestGroupA
Check the owner of the directory. If it is not the row64 user, change the ownership to the row64 user:
sudo chown -R row64 TestGroupA
(Change "TestGroupA" to the name of your new dashboard group).
Enable Access to the Dashboard Group
Dashboard access is defined by user roles. If the dashboard group is not listed in the role, then the user will not be able to access the dashboard.
Open the config file:
subl /opt/row64server/conf/config.json
Go to the "ROLES" section and find the entry for the "PUBLIC" role. This section defines access for the lowest level of access users.
Look for the "DASHBOARDS" field and add a new entry, where the "GROUP" is set to your new dashboard group name.
Set the string in the "ACCESS" field to indicate what kind of access users with this role will have. Codes include:
R= ReadA= AddM= ModifyD= DeleteF= Full access- (Blank) = No access
Set ACCESS_ALL to TRUE if users of this role can access all the dashboards in this group. Otherwise, if set to FALSE, then only dashboards listed in the SPECIFIC section can be accessed.
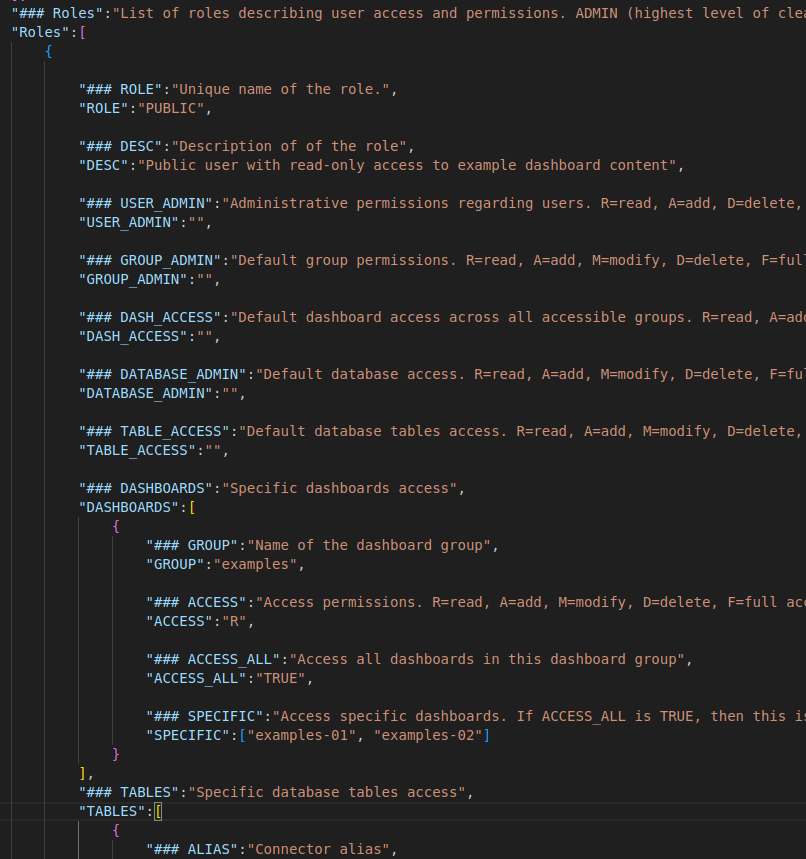
"Roles":[
    {

        "ROLE":"PUBLIC",

         ...

    "DASHBOARDS":[
             {
                 "GROUP":"TestGroupA",
                 "ACCESS":"R",
                 "ACCESS_ALL":"TRUE",
                 "SPECIFIC":[]
             },

        ...

         ],

...
After making changes, save the file.
Note
Version 3.4 does not offer the delete functionality in Studio. This should be done Server-side.
Restart the Server
Once you have modified the folders and the config file, you need to restart the Row64 Server.
sudo systemctl restart row64server
Verify the New Dashboard Group
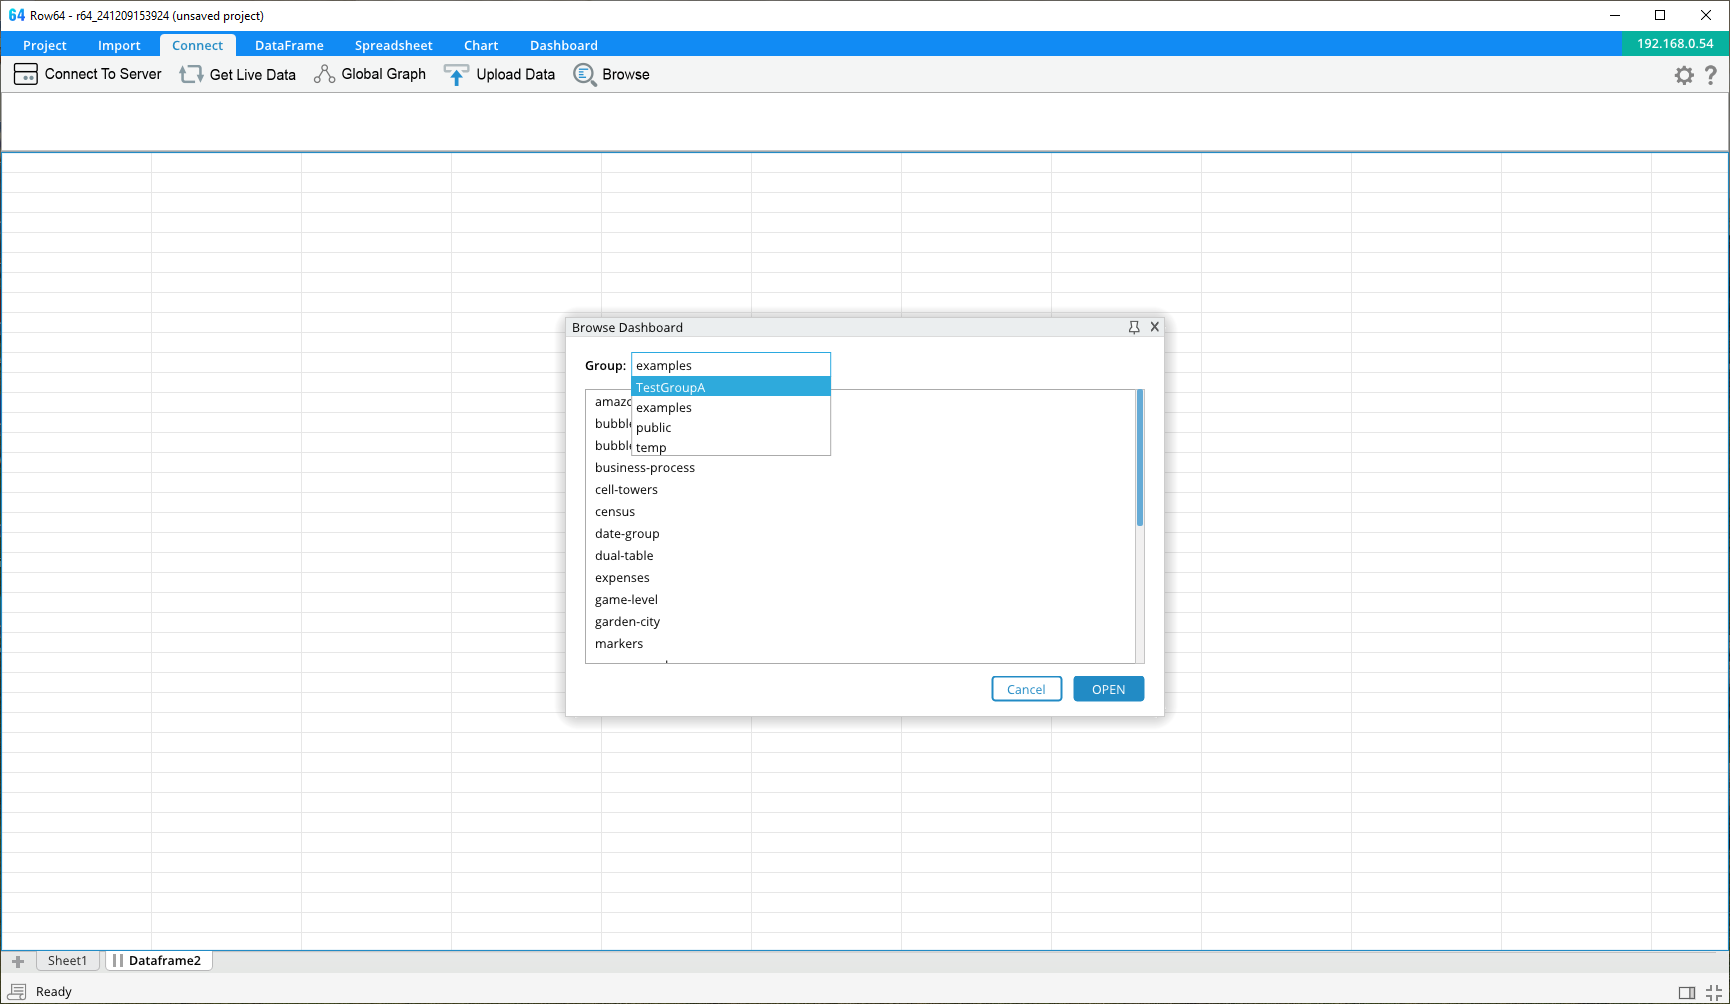
In the Studio app, connect to the server and click Browse. In the group combo box, you should see your new dashboard group listed.
User Roles
User Roles Define Access
User roles are defined in the Row64 Server config file located at: /opt/row64server/conf/config.json
Navigate to the "Roles" section to add new role definitions.
There are two reserved role names:
- ADMIN users have the highest level of clearance. There is no entry for the ADMIN role since it is assumed that any user with this role has access to everything.
- PUBLIC users have the lowest level of clearance. There is an entry for the PUBLIC role, which describes access for any public user able to connect without logging in. For example, if you want some dashboards to be publicly available on the web, then you may want to list them in this section.
If changes are made to config.json, then the Row64 Server service needs to be restarted.
Access Values
Within the role definitions, there are multiple fields where you can specify a level of access. The access value is a string value with one or more of the following letters:
R- Enables readA- Enables addM- Enables modifyD- Enables deleteF- Full access (equivalent RAMD)""- A blank access field indicates no access
For example, "R" would mean read access only. "AM" would mean the user can add and modify, but cannot delete.
In general, if a role is granted anything more than "R", then it is assumed that they also have read access.
Note
Version 3.4 does not offer complete add or delete functionality for all features from Studio. Actions such as adding or removing connection or database groups and dashboard groups should be done Server-side.
JSON Definition for Roles
Below is an example of a typical role entry in the config file:
"Roles":[
    {

    "ROLE":"BETA",
    "DESC":"Has read access to everything, with limited write access.",
    "USER_ADMIN":"R",
    "GROUP_ADMIN":"R",
    "DASH_ACCESS":"R",
    "DATABASE_ADMIN":"R",
    "TABLE_ACCESS":"R",
    "DASHBOARDS":[
        {
            "GROUP":"BetaGroup",
            "ACCESS":"F",
            "ACCESS_ALL":"TRUE",
            "SPECIFIC":[]
        }
    ],
    "TABLES":[
        {
            "ALIAS":"Row64",
            "DATABASE":"Temp",
            "ACCESS":"RAM",
            "ACCESS_ALL":"TRUE",
            "SPECIFIC":[]
        }
    ]

    }
    ...
The ROLE field is the unique name of the role.
The DESC field is a short description about the role. You can leave this blank if you do not want to add a description.
General Access Areas
There are five types of access that can be configured for each role:
USER_ADMINdescribes permissions for managing the registered users table.GROUP_ADMINdescribes permissions for managing dashboard groups.DASH_ACCESSdescribes default access for dashboards (the.dashfiles) and applies to all dashboards on the server. If you want to restrict this role to only have access to specific dashboards, then leave this field blank, and you list the accessible dashboards in theDASHBOARDSfield.DATABASE_ADMINdescribes permissions for managing connection and database groups.TABLE_ACCESSdescribes default access for dataframe tables (the.ramdbfiles) and applies to all tables on the server. If you want to restrict this role to only have access to specific dataframes, then leave this field blank, and list the accessible dataframes in theTABLESfield.
Overriding Default Dashboard Access
Entries under DASHBOARDS supersede the access in DASH_ACCESS.
Within the DASHBOARDS field, you can indicate access to specific Dashboards and/or Dashboard Groups. For each entry in this field, the ACCESS field overrides the DASH_ACCESS value.
Within the DASHBOARDS entry:
- The
GROUPfield contains the name of the dashboard group. - The
ACCESSfield the type of access for dashboards in this dashboard group. - Set
ACCESS_ALLtoTRUEif this applies to all dashboards in this dashboard group. Otherwise, setACCESS_ALLtoFALSEand list the names of the specific dashboards this applies to in theSPECIFICfield.
In this example, the user has full read/write access to all BetaGroup dashboards. But, for all other dashboards, this user would only have read access.
Overriding Default Dataframe Access
Entries under TABLES supersede the access in TABLE_ACCESS.
Within the TABLES field, you indicate access to specific Dataframes. For each entry in this field, the ACCESS field overrides the TABLE_ACCESS value.
Within the TABLES entry:
- The
ALIASfield is the name of the connection group. - The
DATABASEfield is the name of the database group. - The
ACCESSfield the type of access for dataframes in this database group. - Set
ACCESS_ALLtoTRUEif this applies to all dataframes in this database group. Otherwise, setACCESS_ALLtoFALSEand list the names of the specific dataframes this applies to in theSPECIFICfield.
In this example, the user can read, add, and modify all dataframes in the Row64/Temp group. But, for all other dataframes, this user would only have read access.
Reserved Roles - ADMIN and PUBLIC
There are two reserved roles with special behavior: ADMIN and PUBLIC.
The ADMIN role is a reserved role. Users with the ADMIN role have the highest level of clearance available. This role cannot be customized. Do not add it to the Roles section of the config file.
The PUBLIC role is a reserved role that can be customized. If it is not specified in the Roles section of the config file, then users with the PUBLIC role have the lowest level of clearance (no access). If you want to allow some public access, then include PUBLIC as one of the roles in the Config file. All user connections that are not authenticated are considered PUBLIC.
User Management
Row64 User Table
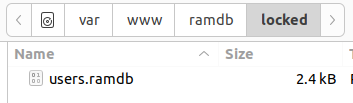
Both BASIC LOGIN and AUTH0 modes require users to be registered in the Row64 User Table. This table is stored in the /var/www/ramdb/locked folder.
For AUTH0 mode, users must be registered in both the Row64 User Table and in Auth0. Federated security requires the data to be in both places and to match.
User management can be done in two ways:
- Use the Row64 UserTool installed with the Server.
- Manage users from Row64 Studio
Row64 UserTool
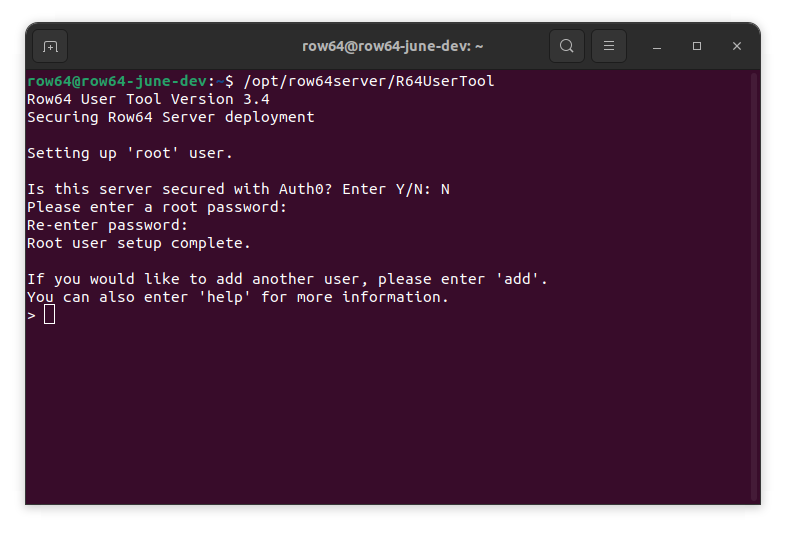
Set Up the Root User
If your Server has been set to BASIC_LOGIN or AUTH0 mode, then you must create a root user before you restart the server. If a root user has not been created, the Row64 Server service will fail to start.
Users cannot be generated or managed from Row64 Studio until the root user has been created.
To create the root user, run the Row64 UserTool. This is a command line utility for managing users.
/opt/row64server/R64UserTool
Follow the prompts to create the root user. You will not need to set a username since the root user is always called root.
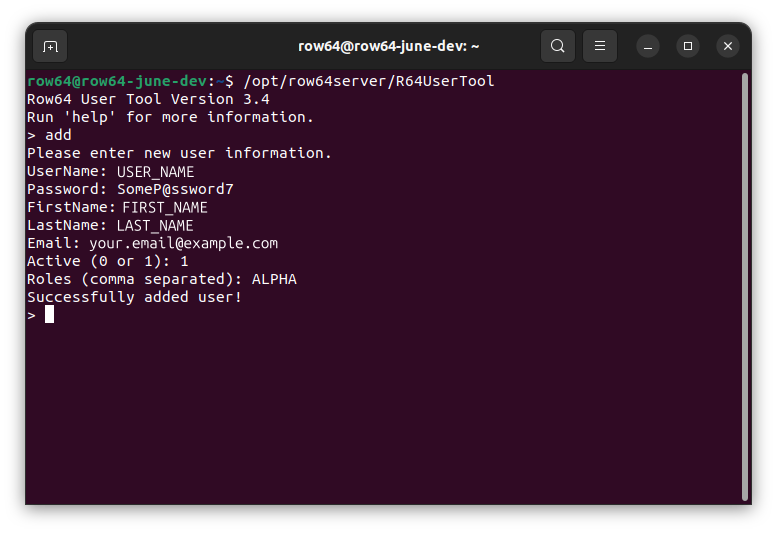
Add Users
From the Row64 UserTool, type add and follow the prompts to add additional users.
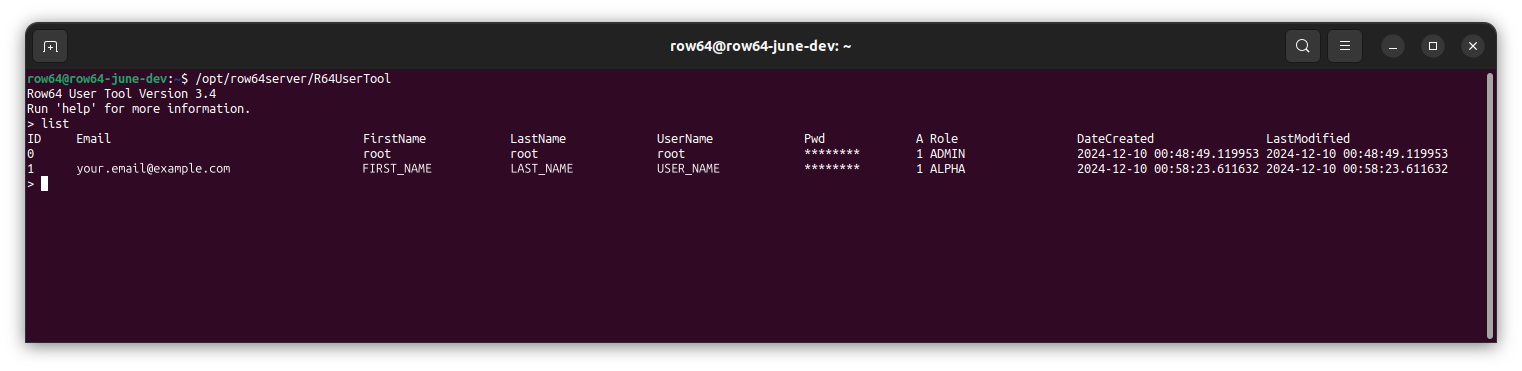
View All Users
From the Row64 UserTool, you can use the list command to view all users.
Row64 Studio
The second method for user management is to use Row64 Studio. From the Row64 Studio, connect to the Server and log in. You must be a user with a role that has User Admin privileges.
If you have successfully connected, then an Admin button will appear in the Connect window. Click this to open the Dashboard Admin UI.

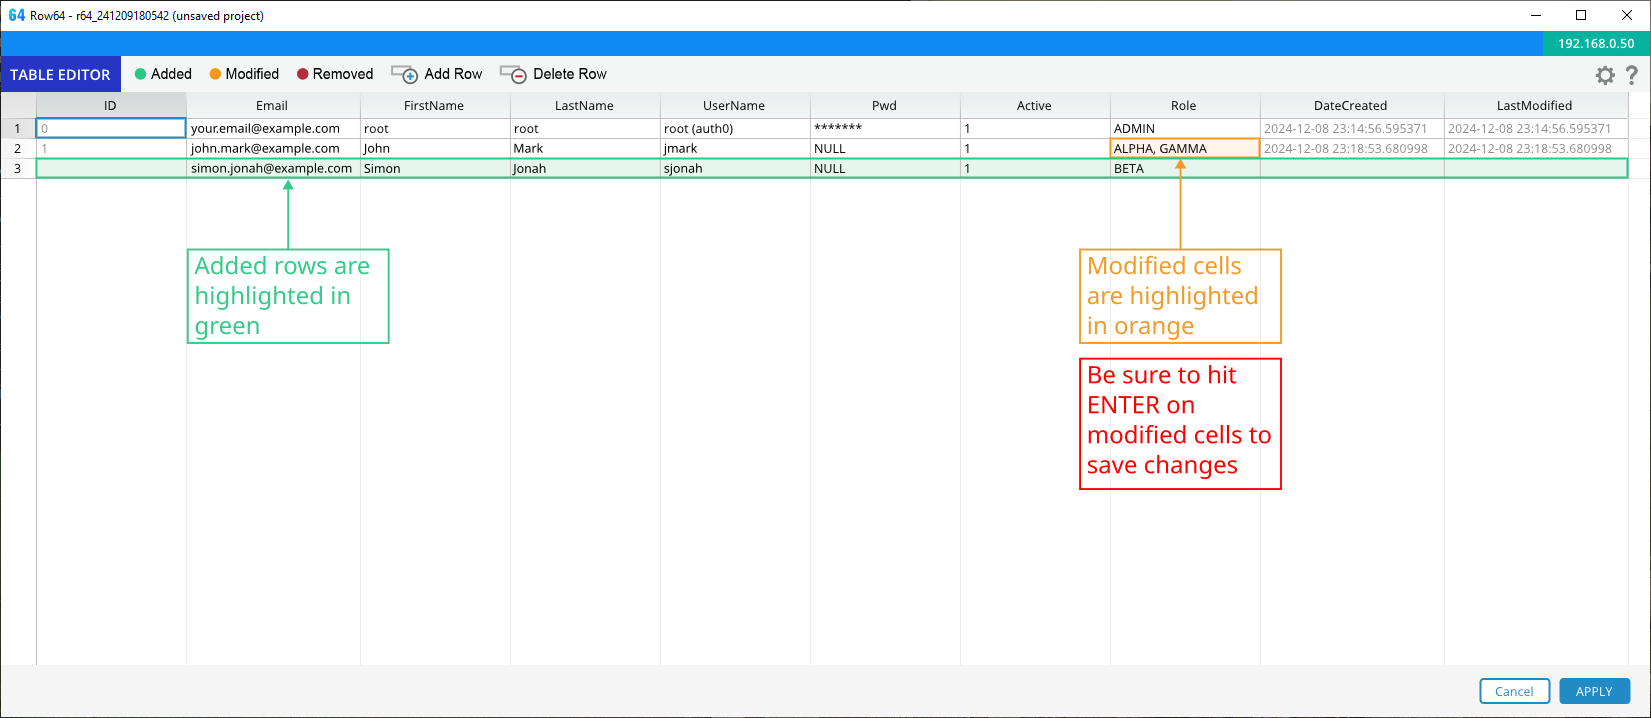
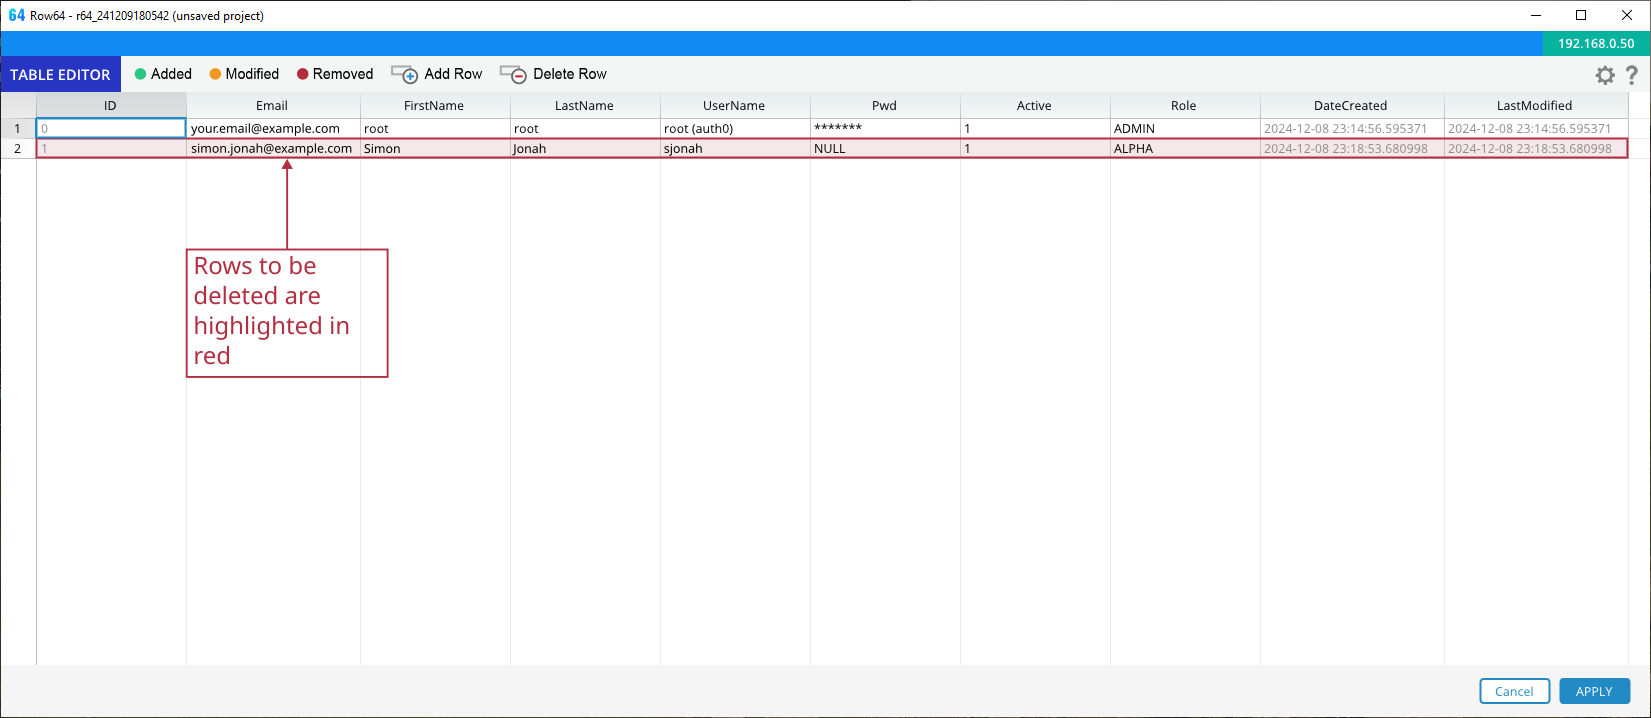
The Dashboard Admin UI
When you open the Dashboard Admin UI, it will show you the table of users.
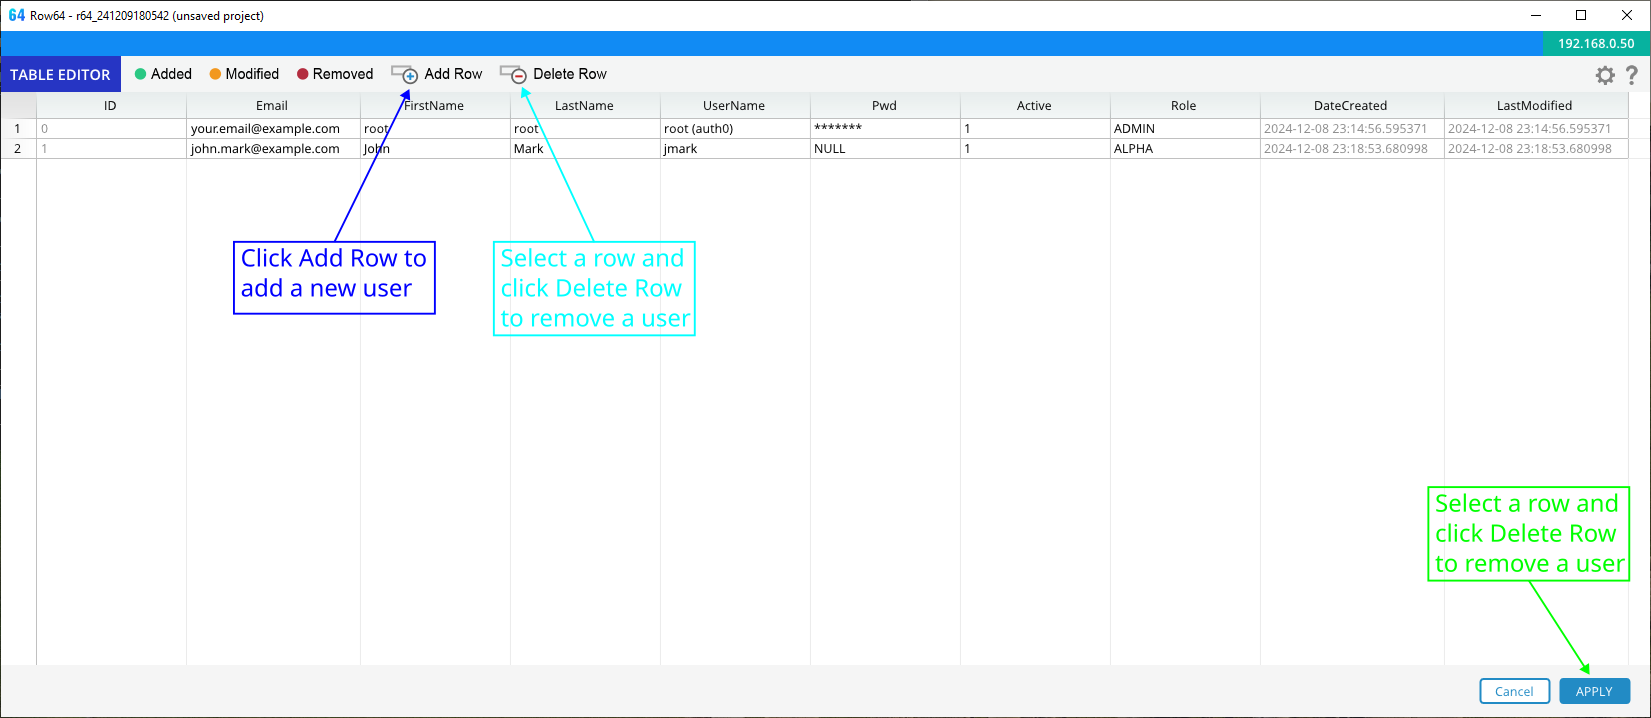
Changes made through the Dashboard Admin UI are color coded.