DashAPI Basic Usage
The DashAPI is a feature of row64tools and follows a similar process as row64tools. Using the DashAPI involves creating Python files, importing the row64tools and DashAPI libraries, writing the dashboard configuration, and executing the Python code. When the Python code successfully executes, new dashboard files will be generated and accessible on the user's browser.
Row64 Server
Users need Row64 Server installed and running on their system to view generated dashboards from their browsers. Row64 Server is not required for operating the DashAPI, but is necessary for viewing the dashboards. To install Row64 Server, please see the Row64 Server guide and visit the page for your corresponding operating system.
Before proceeding with the examples throughout this documentation, please ensure that row64tools is installed according to the DashAPI Installation page.
Create Python File
First, users will need to create a Python (.py) file. This can be accomplished either with a text editor or through the terminal. This example will use a text editor.
Open a text editor and create a new file. Save the file to a desired location and give it a name, such as First_Dash.py.
Write the Configuration
Users can either write their own dashboard configurations from scratch, or copy and paste an example from this documentation. For quick access, several examples and templates are provided on the DashAPI Examples page. These examples are designed to work as is, but users can use these as templates and make modifications to generate custom dashboards.
It is essential to correctly import the row64tools and DashAPI libraries. When writing DashAPI Python configurations, always include the following import line at the top of the file:
from row64tools.dash64 import dash64
Creating a new dashboard or editing an existing one requires different configuration code. This example will create a new and basic dashboard, but you can find information on the differences between creating and editing existing dashboards on the Creating and Modifying Dashboards page.
To create a new and basic dashboard, write or paste the following code into your Python file. This code includes the needed library import line at the top:
from row64tools.dash64 import dash64
dash = dash64("/var/www/dashboards/temp/layout_demo.dash")
pList = [
    ["Main",                "",                 "1000",         "800",      "y"],
    ["Header",              "Main",             "*",            "15%",      "" ],
    ["BottomPane",          "Main",             "*",            "*",        "x"],
    ["Footer",              "Main",             "*",            "10%",      "" ],
    ["Bar",                 "BottomPane",       "20%",          "*",        "" ],
    ["MainPane",            "BottomPane",       "*",            "*",        "" ],
    ["RightBar",            "BottomPane",       "20%",          "*",        "" ]
]
dash.Layout.set_panes(pList)
dash.set_pane_def("Header", [["Color",0xa2e9dc],["Text","Header","BH2V2S35"]])
dash.set_pane_def("Bar", [["Color",0x0344b9],["Text","Bar","BH2V2S35OFFFFFF"]])
dash.set_pane_def("MainPane", [["Color",0x02a8ee],["Text","MainPane","BH2V2S35OFFFFFF"]])
dash.set_pane_def("Footer", [["Color",0x008480],["Text","Footer","BH2V2S35OFFFFFF"]])
dash.set_pane_def("RightBar", [["Color",0xba2279],["Text","RightBar","BH2V2S35OFFFFFF"]])
dash.save()
Save the file.
A DashAPI configuration file for a new dashboard involves several different components. First, the needed libraries are imported, and then a dashboard file is created. This example code creates a dashboard file called layout_demo.dash in the /var/www/dashboards/temp/ directory. Below is the pList (pane list) block, which defines the pane layout and structure of the dashboard. Then, the dashboard panes are applied to the dashboard according to the list through the dash.Layout.set_panes(pList) function. Finally, the panes are formatted with text and colors with multiple instances of the dash.set_pane_def() function. Pane layouts are described in more detail in the Dashboard Layout page, and formatting in the Pane Formatting page. Since this example is creating a new dashboard, it is using a different configuration structure than what would be needed for editing an existing dashboard. More information is provided on these code components throughout the DashAPI documentation.
Execute the Configuration File
With the dashboard configuration written and saved, you now need to execute the file to generate the dashboard.
Execute the file from the terminal using the python command. Open a terminal, navigate to the file's directory, and then execute it:
python First_Dash.py
python vs python3
You need to use the python command to invoke your Pyenv Python instance rather that invoking the operating system's Python with the python3 command. If you don't have Pyenv configured on your system, you can find instructions in the DashAPI Installation page.
If the code successfully executes, the terminal will output a message that the dashboard was saved, and will provide both a file location and a web link.
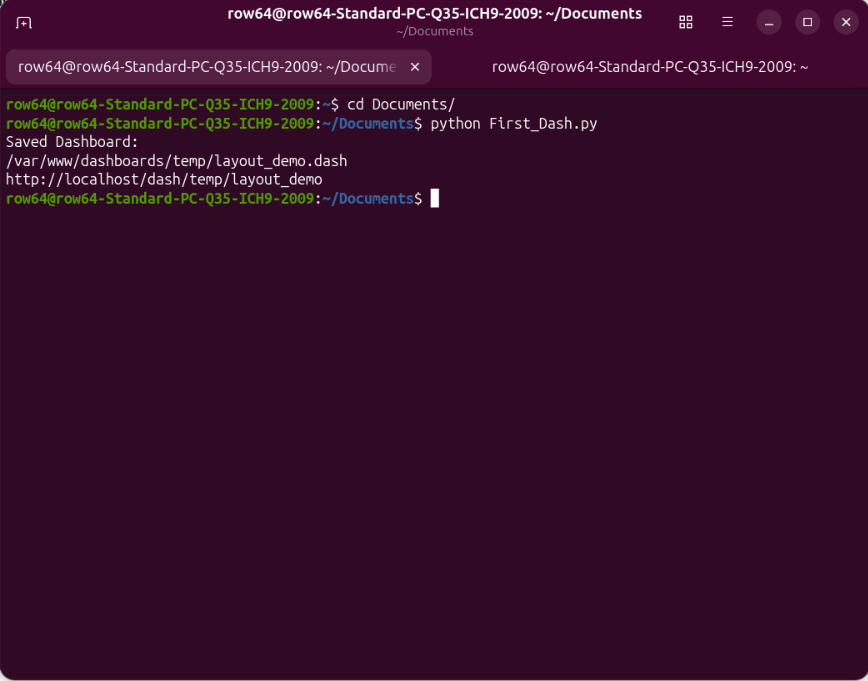
You can access the local dashboard file by following the link. This link was specified in the configuration .py file. If you have Row64 Server installed and running, you can follow the outputted web link to view the generated dashboard in your browser:
